Friday 31 July 2015

Tilted Baby Quilt

Here's my final project in my Tilted quilt pattern series, a baby quilt made for a new cousin. It is made with just four blocks with sashing and borders.


I used the "X" version of the pattern, choosing turquoise and bright pink for the X. All of the fabrics used on the front of the quilt were scraps from previous projects. It was a good way to use up smaller pieces that still have an impact. 


For the backing, I had lots of bright pink fabrics in my stash, from a Color Me Happy bundle, but I don't often use them in my own quilts. I prefer pink in moderation. I thought these playful prints would work for a pieced back. 


The pattern for the back was suggested at a class I took. It involves cutting two squares the same size and sewing them right sides together along all four edges. Then you draw an X from corner to corner on one of the squares and using scissors, cut just that side open along the X. This gives you triangles on each side of the square, making a bigger square. You continue to add squares the size of your new square, making it bigger each time. It ended up as a sort of double-sided quilt!


For the quilting, I went with an all-over pattern of loops and curves, using royal blue thread and staying on the background fabric. I used the rest of the Color Me Happy scraps for the binding. I was working at the cottage and didn't have my Wonder clips. I didn't realize what a difference they make until I didn't have them!


So that's another way to use my Tilted Quilt Pattern and a nice entry into sewing with parallelograms.  It's the last day to enter to win a free copy of the pattern, so head over to the first post for a chance. 

For previous posts on the Tilted Quilt Pattern:

Wednesday 29 July 2015

Weave

Today I have another version of my "Tilted" quilt pattern to share, called "Weave". Tilted Weave was designed for a good friend of mine from university who just got married. I remembered a lot of black and white in her room and a purple hoodie that her husband used to wear. Her husband is a photographer and studied art. I also remembered him posting some black and white photos of sharp lines in buildings, so I though some sort of clean, minimal, geometric design would be suitable. I was playing with colour variations in my Lone Wolf quilt and thought, why not customize a version for them?


I liked the black, white and purple colour combination and wanted prints that were nearly solid - so either a minimal pattern or tone-on-tone. I chose the Black & White print from Cotton & Steel, the purple print and a creamy white print, Zenith - Cream, that I also used in the Lone Wolf version. When I got the wedding invitations and they were silver and purple, I felt good about my choice. When I noticed a photo of a grey couch and bedding in their apartment, I was even happier.


I changed the background colour in the middle strip to white for a little pop. That meant I had to go with purple parallelograms on the white and on the two sections bordering it, as I wanted them to stand out against the background.


For the quilting, I was looking for a simple, all-over design. I went with straight lines and triangles. I chose to leave the parallelograms unquilted so that they would stand out more. It was a big quilt to do on my own machine! Using two fold-up tables, a tv table and parking them all beside the couch, I was able to hold the bulk of the quilt to make the job easier. This quilt also travelled on vacation to the cottage with me for some rainy day sewing, to be abandoned when the sun and paddle boards came out.


The black thread blended in nicely on the back and the white popped out.


I love how the random placement of the pluses on the fabric made it difficult to see where all of the many seams are. That makes for a great background fabric, as the pieces all blend in together.


I found the perfect binding while I was finishing the quilting. The  cream and black and hand-drawn feel of the lines go well with the pluses. I was happy with how well the thread from my machine binding blended in with the crosshatch binding on the back of the quilt. I usually machine bind my quilts, so I may just go with all dark backing and crosshatch bindings from now on! ha


It's one of my favourite quilts that I've made and I hope that the newly married couple enjoys it!

Yes, I dressed to match the quilt ;)
To get the pattern, check out my Etsy shop.

For previous posts about the Tilted pattern and its many variations, go here:

Happy quilting!

Linking up with Link a Finish FridayTGIFF, and Fabric Frenzy Friday.

Monday 27 July 2015

Behind the Design - From Lone Wolf to Tilted

As mentioned in a previous post, I recently bought the computer program Electric Quilt 7 (EQ7).

The first project I tried out was the Lone Wolf Quilt project. A few weeks after I designed it in the program, I remembered that I wanted to try out some different colour variations in an all-over pattern. That was when I started to get really excited about the program, if I wasn't already. Before, I would have photocopied my graph paper with my blank layout, then used pencil crayons to fill it in and try out different colours. I like this method and it can be soothing to sit and colour. However, it also takes a long time, so I usually only try out one or two colour schemes. With EQ7, I was able to try out many colour schemes in a short amount of time. In doing so, I ended up creating 16 colour variations for the quilt, which completely change its look - all with the same layout.* As the design changed, I realized I needed a new name for it as well. Lone Wolf didn't make sense for the other variations. So I renamed the overall parallelogram pattern Tilted.


The Tilted pattern includes instruction for Lone Wolf, Weave and one block, hopefully making it easy to adapt to other variations.
To modify the pattern to make each quilt, it only takes a few simple steps:

1. Pick colours for whichever variation you choose. (You could colour in the pattern template.)
2. Figure out how many parallelograms you need of each colour. Count left and right angled ones separately.
3. Use the pattern to determine how many parallelograms will fit on each strip and how many strips you need.
4. Multiply the number of strips you need by the width of the strip to figure out your yardage for each fabric.

The yardage for the background fabric will stay the same.


It turns out that as daunting as piecing them may seem, 168 parallelograms pack a big punch! I could have kept going and going with new colours and placements. Most of my choices are bright, but you could use more subdued fabrics to change the tone. Choosing four blocks in any of the variations makes for a striking baby quilt or table runner as well. I hope these inspire you to try out the pattern and make it your own!


The Tilted pattern is available as a PDF download in my Etsy shop and comes with images of all the variations. For a chance to win a copy of the pattern, check out my first post,  "Introducing the Tilted Quilt Pattern" and for more on the process behind the design, check out "Behind the Design - Lone Wolf".

* Sorry this sounds like an ad - I promise it's not!

Thursday 23 July 2015

Behind the Design - Lone Wolf

I want to share my process behind the design of the Lone Wolf quilt pattern, as it did not start with me visualizing a concept and putting it together backwards from there. Instead, it started with a few shapes sketched on the bottom of another quilt layout. I liked the look of them and made a mental note to go back to it. Months later, I was on a flight, heading to Lake Louise and pulled out my sketchbook and graph paper to play with the design. I was thinking it might end up with a layout of rows. I started with this:


Which turned into this:


And then I noticed they were turing into diamonds, so I completed the shape:


Then I filled the page with the pattern. I was thinking you could play with colour and value in many ways to vary the design. I jotted down some ideas to try out later when I had my coloured pencils. 


Now, before I was drawing, I had read this issue of Canadian Geographic:


Maybe it was the wolf still in my mind, or that human capacity to recognize faces, but I started to see a face in the pattern - diamond eyes and a diamond nose. It looked sort of wolfish to me. Definitely animal and not human -the shape wasn't quite right, but something was there. So I erased some of the design to get only the wolf head and started to shade in the blocks with my pencil, using darker blocks for the eyes and nose, leaving some white to highlight and colouring the rest in two shades of grey. The eyes looked too far apart still so I pulled out my magazine again and looked at the cover photo for some degree of accuracy. I moved the eyes closer and added a row to the ruff.


Once home, consulting with my brother, he thought I should add some trees to the design so it looked like it was camouflaging. I tried some abstract trees but the wolf face didn't stand out enough. The problem was that the background needed to be a different colour so the wolf stood out, and the colour that made the wolf's face needed to be different shades or values so that the features stood out. Once the trees were added, the contrast was lost.


 Instead, I decided to try adding in the rest of the parallelograms from the original design. I thought if they were the same colour as the background, but in a lighter shade, they would give a sort of camouflage affect too. And so I arrived at the final design. 


A few weeks later I was in at a sale at my local quilt shop and figured I might as well pick up the fabric for this quilt, though it would sit for a few weeks. I auditioned some greys and greens, as I was trying not to make all my quilts blue! The grey prints weren't really working and there was a brown Peppered Cotton on the shelf that I loved. So we picked out some browns to go with it and decided that the green was too literal. So instead, I ended up with some great blue prints that I had been eyeing up and resisting for a while anyway!

So this design really started with a few shapes and just took on a life of its own, without me setting out to draw a wolf. It really wasn't what I intended and I'll probably play with the shapes some more to see what else may come of them. But some things just come together. Near the end of April, when I was working on the quilt, I was driving to work one morning when I happened to spot a wolf.  The sun was just above the trees and it was shining off of old corn stalks and dead grasses on the side of the road, turning everything golden. I was appreciating the sun and turning a bend when it crossed the road in front of me, brown and grey and golden itself, camouflaging quickly in the undergrowth. I figured it was good sign and considered myself lucky to have been paying attention at the right moment.

Come back next week to see how the design developed again once I started playing in EQ7.

For a previous post about this quilt, click here. The quilt pattern, which includes 36 non-wolf variations, is available in my Etsy Shop.

Monday 20 July 2015

Introducing the "Tilted" Quilt Pattern

Today, I am excited to share "Tilted", my first quilt pattern for sale.
The pattern is available on Etsy, via a link in the pattern tab at the top. I worked hard on this pattern and I think it has good versatility. Here is one (rather unique) version of the pattern, called "Lone Wolf".


 It's composed of all parallelograms, half square triangles and rectangles. The face is made up of fabrics in varying shades of brown to create the facial features and shading in the fur. I went with a contrasting blue background with a brighter blue for accent and to continue the parallelogram pattern.


The fabrics may look solid from afar, but I chose a variety of prints. The background is Zenith - Dark Navy, the cream colour is Zenith - Cream, the light brown is A Field Guide - String, the medium brown is Peppered Cotton, the dark brown is Toscana and the blue is Hatch - Night.


It's one of those designs that's difficult to see close up, as the quilt is pretty big - 87 1/2" x 99"! Once you step back to see all of it at once, the wolf face starts to appear.


As for the pattern, it includes 10 variations, with step by step instructions and diagrams to make this Lone Wolf version, the cover quilt, Weave, as well as a single block. By making four blocks, you can make a mini, baby quilt, or table runner. By changing the colour placement and values of the fabrics, there are many more variations possible. Along with the PDF pattern download comes another PDF with images of 20 more variations to give you more ideas.

To get the pattern, check out my new Etsy shop!

To celebrate, I'm giving away one copy of the PDF pattern. To enter, just leave a comment. For a second entry, follow me on Etsy and leave another comment letting me know. The giveaway closes July 31st.

Over the next two weeks I'll be sharing more about the Tilted pattern and its design process, including two of the variations. For now, the Lone Wolf quilt top sits on my machine and is in the process of being quilted. I can't wait to share more with you!


Linking up with Main Crush Monday and Show and Tell Tuesday.

Tuesday 7 July 2015

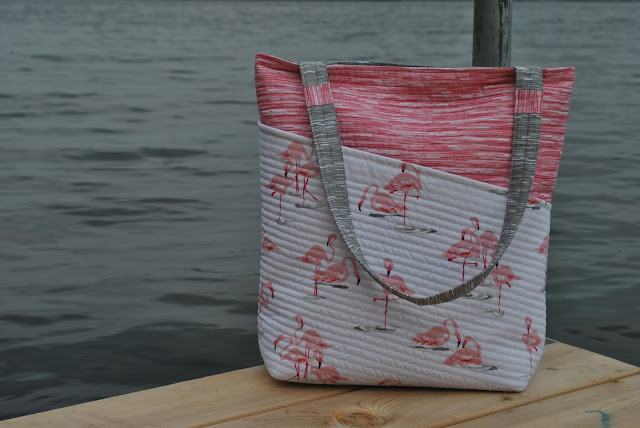
Flamingo Tote Bag

I was browsing the shelves at my local quilt shop recently and noticed some new fabric - pink flamingos on a white background with a watercolour vibe. Apparently flamingos are a trend right now and though I don't usually go for trends, I couldn't pass these up. For me, the word flamingo evokes images of cheesy plastic lawn ornaments, but these flamingos are softer and more subtle. A few coordinating prints from the line were right next to it and the grey, pink and white combo was calling to be made into an Edge Tote.

Edge Tote pattern

So when my Mom decided to make an Edge Tote for her trip, I decided it didn't matter that I have two large tops to be quilted and a charity quilt that hasn't been started yet and that I'd make one with her.

I decided to stick with three colours again for this one, but I made a few modifications to the design. I added a small pocket and magnetic clasps to the top of the bag lining before I sewed it together. I also added magnetic clasps to the outside pocket before it was quilted and to the bag front after it was quilted. That way, all the clasps are hidden away. I thought it might be nice to be able to keep the bag and pocket closed.


I added in a strip of pink to the bottom of the handles with a bit of leftover fabric. I really like the effect. The handles were quilted the same as my other versions, though I quilted the bag differently.

Fabrics designed by Jane Dixon for Andover fabrics
I went with straight parallel lines for the quilting, spaced about 3/8" apart, using the edge of my presser foot as a guide. I LOVE how this turned out. I've always liked the look of this kind of straight line quilting, but hadn't tried it before. When Anna of Noodlehead posted her Market Bag from her book Handmade Style last week, I finally ordered the book and used the quilting as inspiration.
(p.s. for my fellow Canadians, Chapters has it listed online at 37% off with free shipping.)


The denser quilting added a lot of structure and stability to the bag, so it stands up on its own. I went with diagonal lines to match the angle of the pocket and like how it plays off against the horizontal lines.


Another bag that I'm sure is going to get a lot of use this summer :)